Contents
- Index
Microphone and Speaker Setup
The Microphone and Speaker Setup panel can be reached from the Options menu on the Main Form. This panel helps you adjust your audio equipment to let Music + One work its best. This panel appears automatically the first time you run M+O, though you should run these tests every time you make any change to your microphone or speakers, including moving their position.
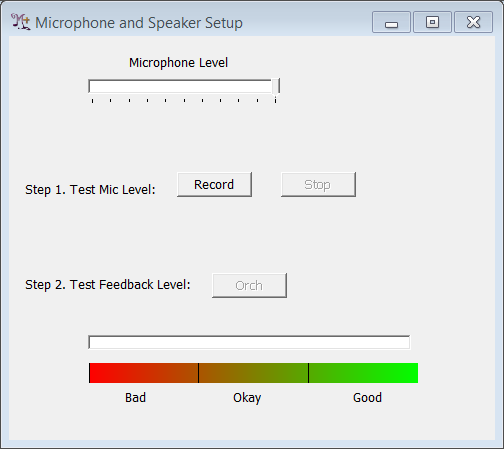
First use the "Test Mic Level" test to ensure that your microphone is working and that the signal coming from your instrument is at the right level. In general you want to have the microphone as close to your instrument as possible. See Speakers and Microphones for more discussion on this. Hit the Record button and play near your loudest level. As you do this, watch the Volume Meter on the Main Form. The indicator should be at least 3/4 of the way to the top, occasionally going into the dark green region, but not going into the red. Hit Stop when you are finished with this.
You can use the Microphone Level slider at the top of the form to control the microphone level. This slider will affect the recording level only if you are using your computer's built-in audio hardware. If you are using external hardware such as a USB audio interface or sound card, use the volume control on that device instead.
The volume meter should go up and down with your dynamic changes. If the indicator doesn't respond to your instrument, or if you get a message saying "No microphone signal", exit M+O and try the Windows "Sound Recorder" program (under Accessories) to make sure you have a working microphone. If you cannot record and play back audio with this program, check to see that the Windows MIxer controls have not muted the microphone, make sure the microphone level is not set to 0, and make sure that "Microphone" (not "Line In") is set for the recording source. If you still cannot record audio with the "Sound Recorder" program, your computer may not have a built in microphone - not all computers do. An inexpensive computer microphone will work fine with M+O (though may limit the quality of any recordings you make). Get a microphone and plug it into the microphone jack and try again.
Once you have a working microphone and have set the appropriate recording level, perform the "Test Feedback Level" test. This checks to see that the microphone is not getting too much sound from the speakers. If you are listening to M+O's output with headphones you don't need to perform this test. Before performing this test, position your speakers where you intend to use them with M+O. In general, the distance from the speakers to the microphone should be several times the distance from your instrument to the mic. See Speakers and Microphones for more discussion of this issue. When you hit the Orch button M+O will play an audio excerpt. Repeat this process, adjusting the volume on the Mix Panel to a level that balances your instrument. When you are happy with the volume from the speakers, hit the Orch button again and observe the position of the slider at the bottom of the form when the excerpt is finished. The indicator should appear in the "Good" region. If it does not, move the microphone closer to your instrument and perform both the microphone test and the feedback test again.
If you do not get the desired results from these tests, M+O will not prevent you from continuing to use the program, though it is strongly recommended that you take care in getting the levels and positioning of the audio equipment set properly.